OWASP Nightingale
Welcome to the Nightingale documentation! This guide will provide you with all the information you need to install and set up Nightingale, a powerful open-source tool that utilizes the power of Docker to provide a ready-to-use environment for penetration testing.
Why Nightingale?
Penetration testing plays a vital role in safeguarding an organization’s IT infrastructure. However, setting up a testing environment is often a time-intensive and complex process, requiring the installation of multiple tools, frameworks, and programming languages. Ensuring consistency across different environments can also pose significant challenges, making it difficult for organizations to effectively identify and address vulnerabilities.
How Nightingale Simplifies Penetration Testing
Nightingale is an open-source solution designed to overcome these challenges by offering a pre-configured, ready-to-use environment for penetration testers. Built on top of Docker, Nightingale streamlines the setup process, eliminating the need to manually install and configure programming languages and modules.

Nightingale is an open-source tool leveraging Docker to provide a ready-to-use environment for penetration testers. It simplifies the setup and management of testing environments for web applications, network infrastructure, and other systems.
Docker, a powerful containerization technology, allows users to create isolated and consistent environments. For penetration testing, this translates into easily reproducible setups, saving significant time and effort when tests need to be re-run.
Key Benefits of Nightingale
Nightingale is an open-source, Docker-based penetration testing toolkit designed to streamline security assessments. Its features address common challenges in setting up and managing testing environments, making it an essential tool for penetration testers.
- Eliminates Complex Setup
- Nightingale removes the need to install multiple programming languages and modules. Testers can skip the tedious process of configuring environments from scratch, saving valuable time and effort.
- Fast and Efficient Booting
- Leveraging Docker’s lightweight containerization, Nightingale enables rapid environment creation and teardown. This speeds up testing workflows and minimizes downtime.
- Resource Efficiency
- Nightingale is optimized for resource efficiency, utilizing only the necessary hardware resources. It’s particularly beneficial for testers working with limited system resources.
- Comprehensive Pre-Installed Tools
- Nightingale includes a variety of essential penetration testing tools and frameworks, making it suitable for vulnerability assessments and penetration testing of any scope.
- Consistent Environment
- Nightingale provides a standardized, repeatable testing environment across different systems. This ensures consistent results, reduces configuration errors, and improves reliability.
- Customizable Configuration
- Users can tailor Nightingale’s setup to their needs by adding or removing tools and frameworks, ensuring a testing environment that aligns with specific requirements.
- Browser-Based Access
- Nightingale allows users to access the testing environment through a web browser using the local IP address. This provides added flexibility and convenience.
- Cross-Platform Compatibility
- Nightingale is platform-independent, allowing penetration testers to use it on any operating system that supports Docker. This ensures a consistent experience across different environments.
Why Choose Nightingale?
Nightingale empowers penetration testers with a platform-independent toolkit, ensuring a consistent, repeatable, and efficient workflow. By leveraging Docker, it enables rapid setup and management of testing environments, saving time and effort while providing all the tools needed for professional penetration testing.
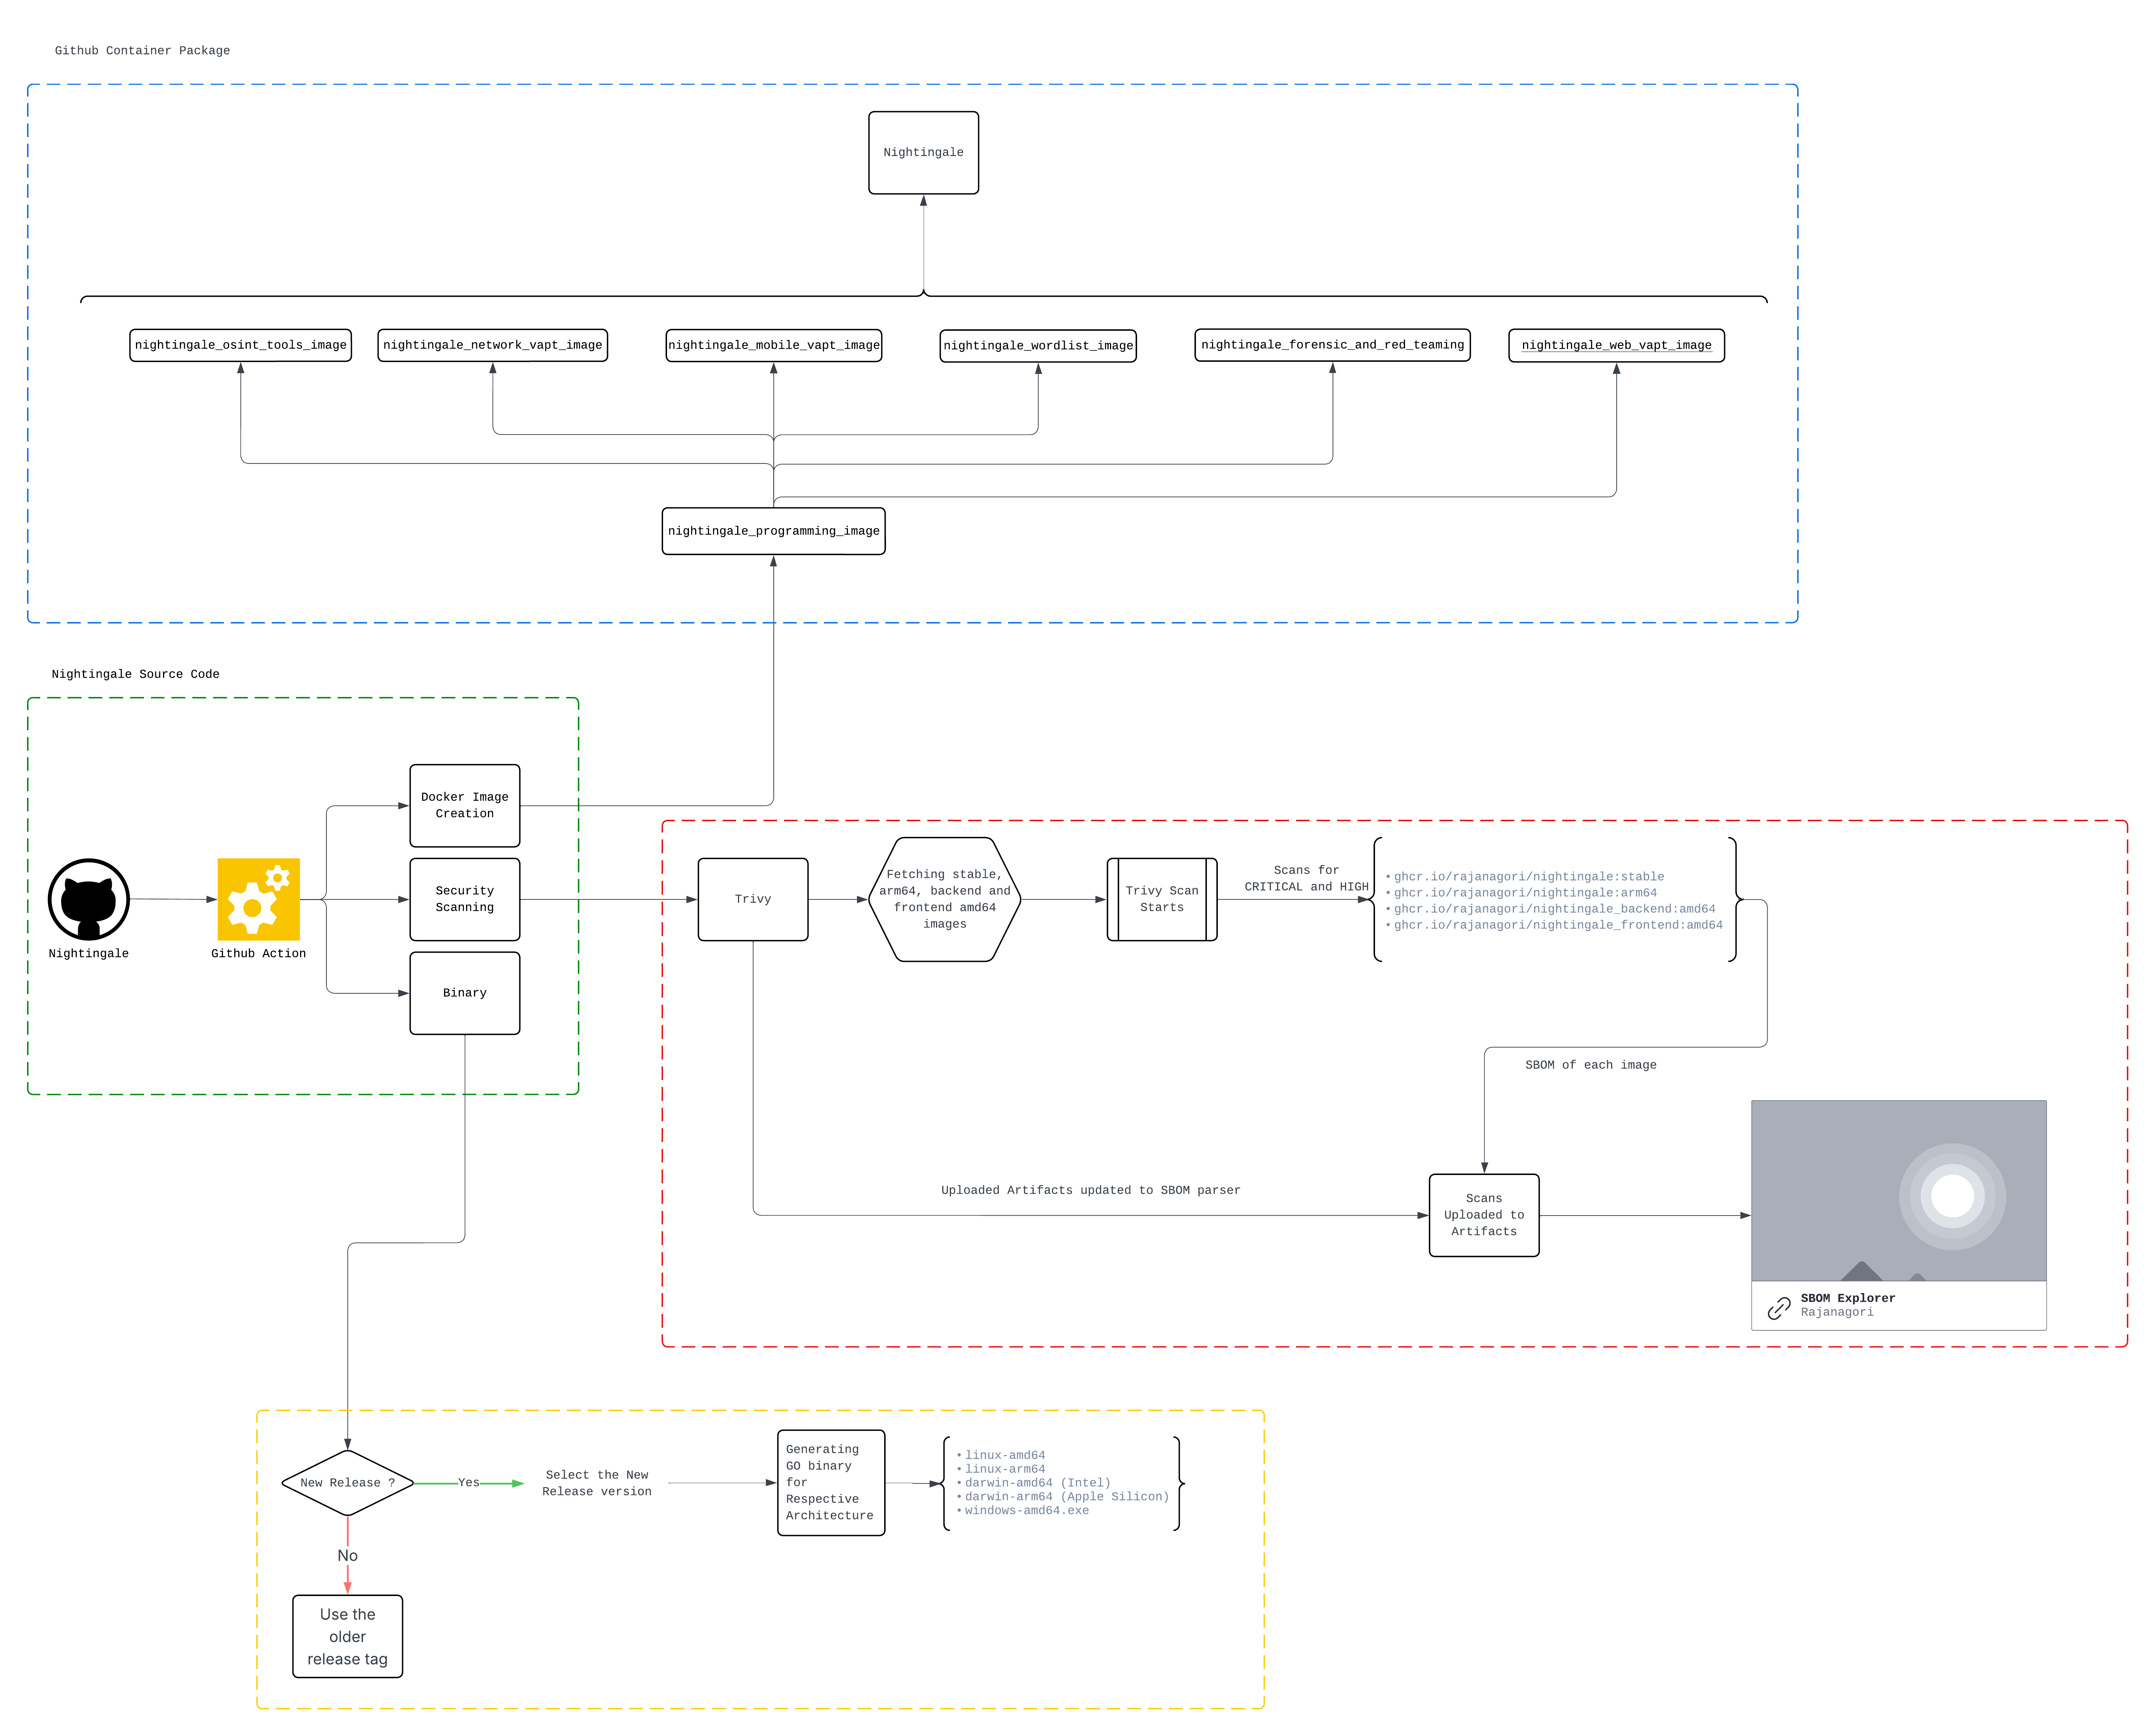
Nightingale General Workflow
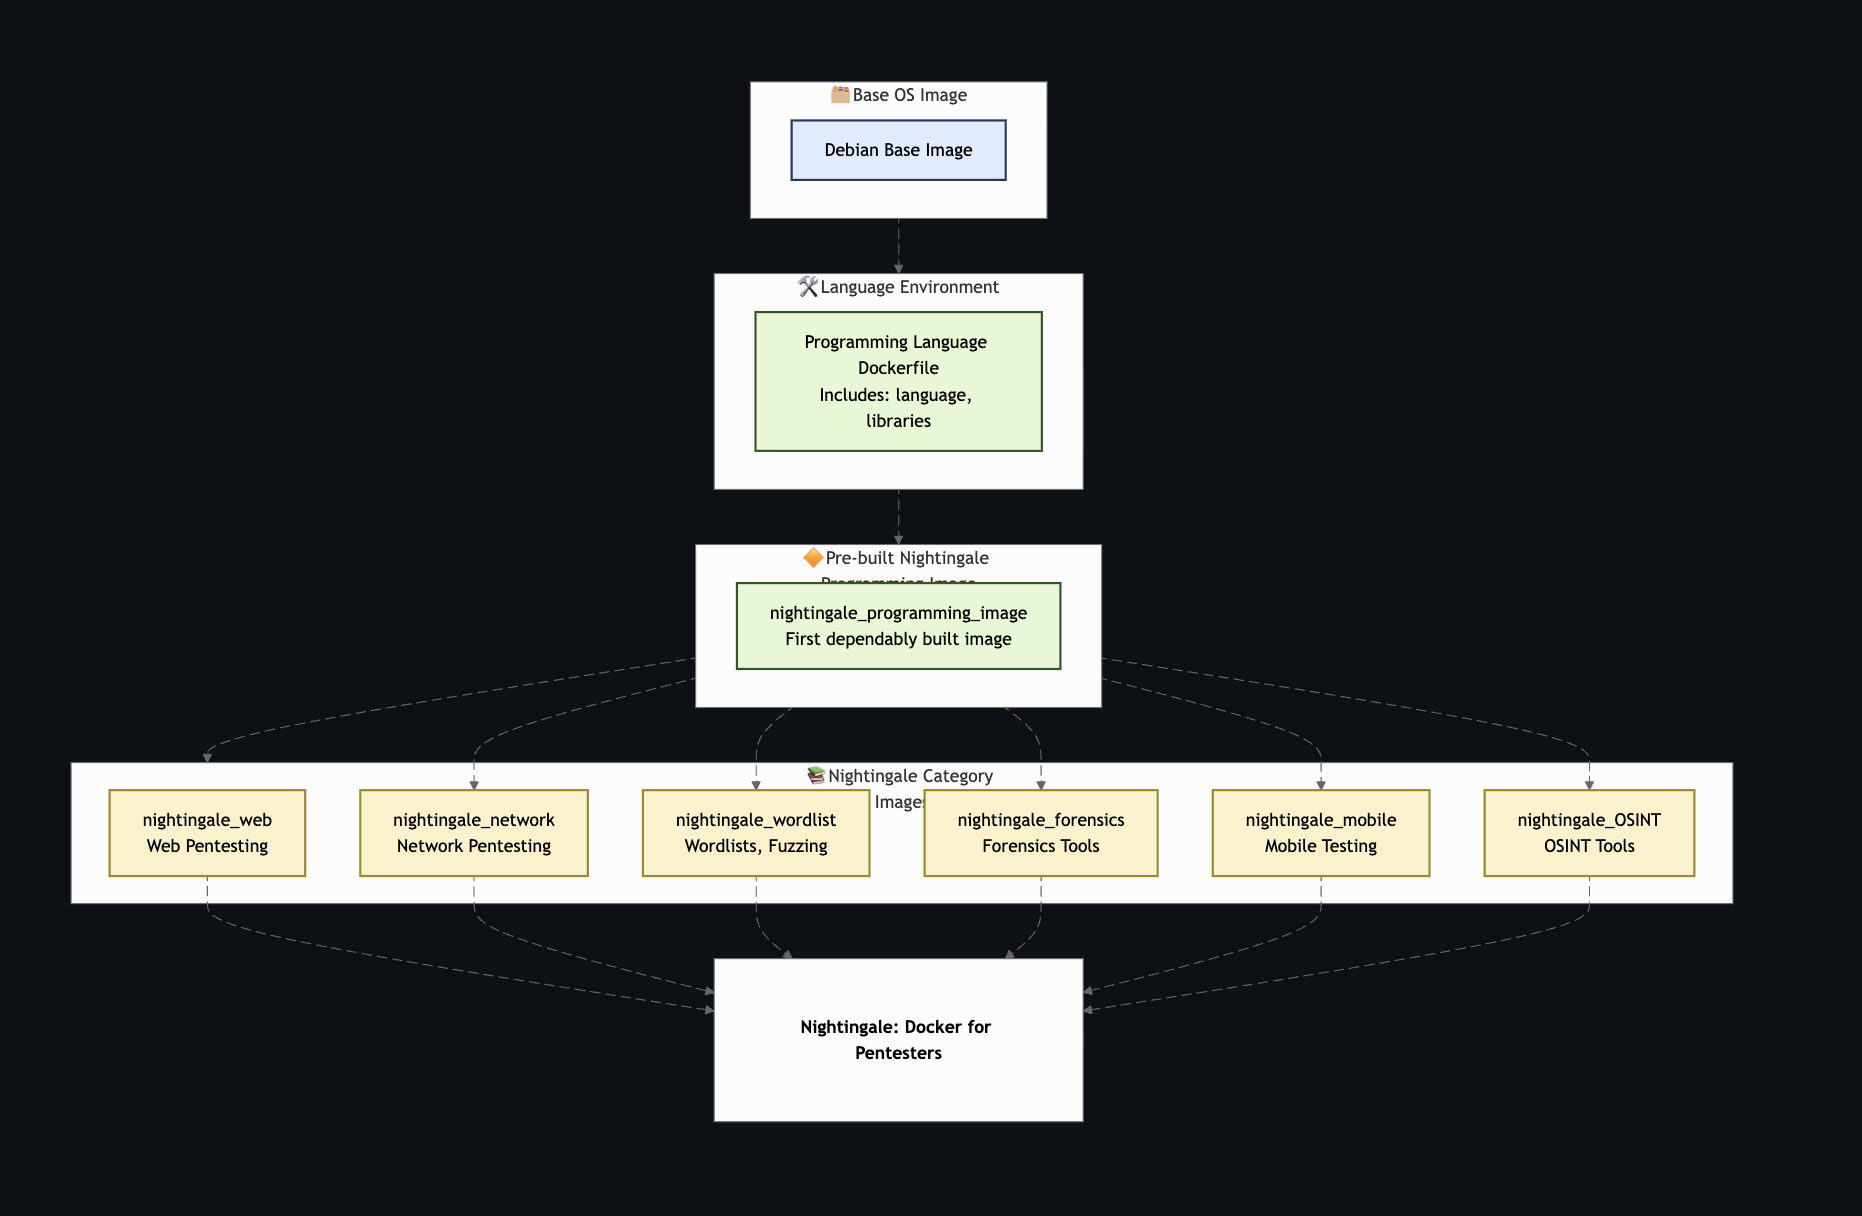
Nightingale Architecture diagram
Available tools
Operating System
Text Editor
- Vim
- Nano
Development Essentials
- locate
- tree
- figlet
- ssh
- git
- curl
- wget
- file
- dos2unix
Terminal Support
- bash (default)
- zsh
Compression Technique
- unzip
- p7zip-full
Network Essentials
- htop
- traceroute
- telnet
- net-tools
- iputils-ping
- whois
- tor
- dnsutils
Web Application VAPT tools
- Whatweb
- sqlmap
- amass
- assetfinder
- dirsearch
- ffuf
- findomain
- gau
- gf
- gobuster
- hawkscan
- httprobe
- httpx
- jwt_tool
- linkfinder
- masscan
- nuclei
- subfinder
- sublist3r
- waybackurls
- xray
- reconspider
- john
- hydra
- Arjun
- Katana
- Trufflehog
- Ghauri
- Detect-Secrets
- Gitleaks
Network VAPT tools
- nmap
- metasploit
- Naabu
- RustScan
OSINT tools
- Reconspider
- recon-ng
- spiderfoot
- metagoofil
- theHarvester
Mobile VAPT tools
- adb
- apktool
- jdax
- Mobile Security Framework (MobSF)
- Runtime Mobile Security (RMS)
- android-framework-res
- frida-tools
- objection
Forensic and Red Team tools
- impacket
- exiftool
- steghide
- binwalk
- foremost
Wordlist
- wfuzz
- Seclists
- dirb
- rockyou.txt
- fuzzdb
- Node Dirbuster
Programming Language Support
- Python 3
- Java
- Ruby
- Node.js
- Go
Helm Package for Nightingale 🦉
Nightingale is an open-source tool that aims to address this problem by providing a ready-to-use environment for pentesters.
This chart bootstraps a Nightingale deployment on a Kubernetes cluster using the Helm package manager.
Let’s Open Feathers in the Cloud: Nightingale Meets Kubernetes! 🌥️
Prerequisites
- Kubernetes 1.19+
- Helm 3.7+
Get Repository Info
To add the Nightingale Helm repository and update it, run the following commands:
helm repo add nightingale https://rajanagori.github.io/Nightingale
helm repo update
Install/Upgrade Chart
Install the Nightingale chart with the release name nightingale in the nightingale namespace.
helm upgrade --install nightingale nightingale/nightingale -n nightingale --create-namespace
Install/Upgrade the chart using just one command
This command will add the Nightingale Helm repository, update it, and install the Nightingale chart with the release name nightingale in the nightingale namespace.
helm upgrade --install nightingale nightingale --repo https://rajanagori.github.io/Nightingale -n nightingale --create-namespace
Values
The provided selection is a table of configuration values typically used in a Kubernetes deployment. Each row represents a different configuration option.
namespaceOverrideis a string that can be used to override the default namespace in which the Kubernetes resources are deployed.replicaCountis an integer that specifies the number of pod replicas to create.image.repository,image.tag, andimage.pullPolicyare strings that define the Docker image to use for the pods, the tag of the image, and the policy for pulling the image, respectively.strategy.typeandstrategy.rollingUpdate.maxUnavailableandstrategy.rollingUpdate.maxSurgeare used to define the update strategy for the deployment. TheRollingUpdatestrategy gradually replaces old pods with new ones.podSecurityContextandsecurityContextare objects that define the security contexts for the pods and containers, respectively.resources.limits.cpu,resources.limits.memory,resources.requests.cpu, andresources.requests.memoryare used to set the CPU and memory resource limits and requests for the containers in the pods.volumesandvolumeMountsare lists that define the volumes to create and where to mount them in the containers, respectively.tolerationsis a list that defines the tolerations for the pods.affinityis an object that defines the affinity/anti-affinity rules for the pods.service.typeandservice.portare used to define the type of service to create and the port it should expose.ingress.enabledis used to define the ingress resource ifingress.enabledis set to true. This includes the ingress class name, annotations, host settings, and TLS settings.autoscalingrelated keys are used to define the horizontal pod autoscaler resource ifautoscaling.enabledis set to true. This includes the minimum and maximum number of pod replicas and the CPU and memory utilization thresholds for scaling.
| Key | Type | Default |
|---|---|---|
| namespaceOverride | String | ”” |
| replicaCount | Int | 1 |
| image.repository | String | ghcr.io/rajanagori/nightingale |
| image.tag | String | stable |
| image.pullPolicy | String | IfNotPresent |
| strategy.type | String | RollingUpdate |
| strategy.rollingUpdate.maxUnavailable | String | 25% |
| strategy.rollingUpdate.maxSurge | String | 25% |
| podSecurityContext | Object | {} |
| securityContext | Object | {} |
| resources.limits.cpu | String | 100m |
| resources.limits.memory | String | 200Mi |
| resources.requests.cpu | String | 50m |
| resources.requests.memory | String | 100Mi |
| volumes | List | [] |
| volumeMounts | List | [] |
| tolerations | List | [] |
| affinity | Object | {} |
| service.type | String | ClusterIP |
| service.port | Int | 80 |
| ingress.enabled | Bool | false |
| ingress.ingressClassName | String | nginx |
| ingress.annotations | Object | {} |
| ingress.host.enabled | Bool | false |
| ingress.host.name | String | ”” |
| ingress.tls.enabled | Bool | false |
| autoscaling.enabled | Bool | false |
| autoscaling.minReplicas | Int | 1 |
| autoscaling.maxReplicas | Int | 10 |
| autoscaling.cpuUtilization | Int | 80 |
| autoscaling.memoryUtilization | Int | 95 |
Uninstall Chart
To uninstall the Nightingale chart, run the following command:
helm uninstall nightinfgale -n nightingale